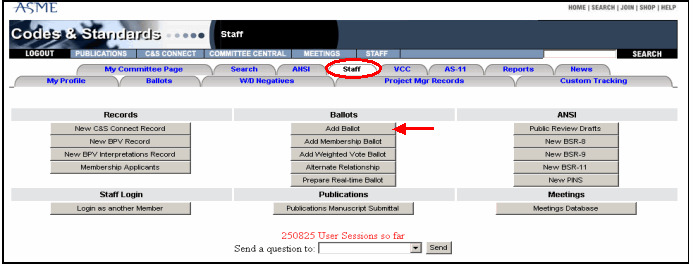
All ballots are created by going to C&S Connect > Staff tab. (For information about features like Automatic email, see Other Standard Ballot Features .
To create a new standard ballot, under Ballots, click the Add Ballot button:
You will be taken to the Add Ballot Form:
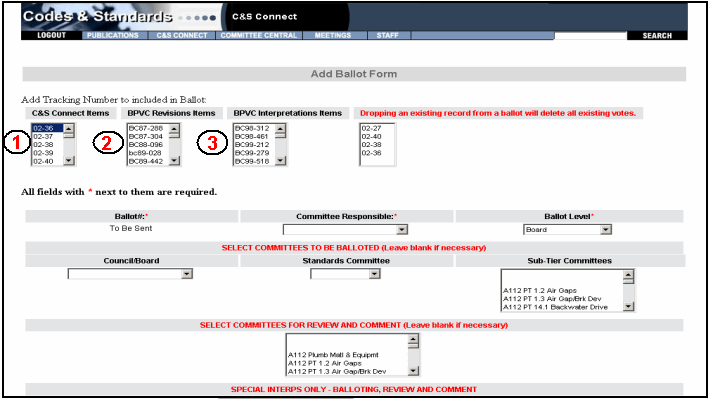
Select the records you want to add to the ballot by clicking on the number of the record. Records are sorted into three columns: C&S Connect Items (See 1 above), BPVC Revisions Items (2), and BPVC Interpretation Items (3). Once a record number is clicked, it appears in the column on the right. These record numbers also appear on the Voting Ballot Form.
Select the appropriate information for the following fields:
Committee Responsible: The committee that is sending the ballot.
Ballot Level: The committee level at which the ballot is going for vote. Note: Use of ballot levels varies by department. Check your departmental procedures.
Board – For items going to the Board for Procedural Review. Approve/disapprove voting option
Standards Committee - Approve/disapprove voting option
Subcommittee - Approve/disapprove voting option
Standards Action – For items going to the Board for Procedural Review. Objection/No Objection voting option
Council: Approve/disapprove voting option
Editorial Review: For editorial (non-technical) revisions only. Objection/No Objection voting option
Project Team: Currently inactive.
Select the appropriate information for the Select Committees to be Balloted. These are the committees that will receive the ballot for voting. Use the Ctrl button on your keyboard to make multiple selections. You are limited to 10 selections per ballot. Contact the Help Desk if you require additional selections.
Council/Board: All are visible to every staff member.
Standards Committee: Only committees for which you are the secretary are listed.
Sub-Tier Committees: All are visible to every staff member.
Select the appropriate information, if needed, for the Select Committees for Review and Comment. These are the committees that will receive the ballot for review and comment.
Select the appropriate information for the Special Interps Only. These are voted on by Special Committee Method.
The bottom half of the screen looks like this and contains the following fields:
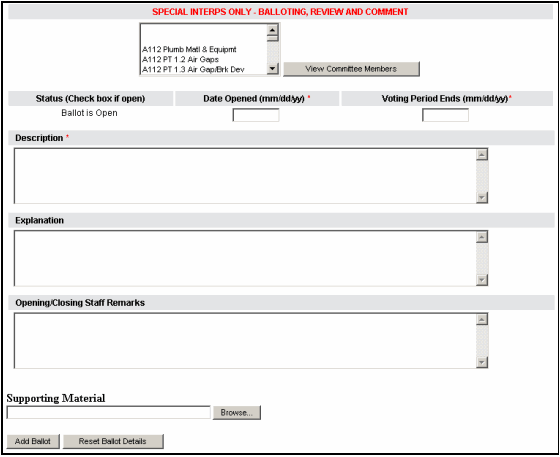
Enter dates in the following fields, in mm/dd/yy format:
Date Opened: The date the ballot is opened. This date is filled in automatically.
Voting Period Ends: The projected close date of the ballot.
Enter information in the following fields:
Description: Enter a brief description for the ballot. This varies by department, but here is an example: “CONAGT Letter Ballot; Adoption of AG-1, Section FK; Special HEPA Filters”
Explanation: Enter a more detailed description for the ballot.
Opening/Closing Staff Remarks: Enter any special text regarding the opening (or later, the closing) of the ballot. This text is included in automatic email notifications issued by C&S Connect.
Attach any additional files by browsing to their location in Supporting Material.
Click the Add Ballot button. After a few moments, a confirmation prompt appears, displaying your new ballot number.
Other standard ballot features include:
Automatic email is distributed to all voting members when the ballots are opened or closed. The email includes:
Ballot Number
Open and Close Dates
Link to Ballot
Description
Explanation
Staff Remarks
Note: Automatic emails are not stored on C&S Connect. If you need to keep a copy to meet ANSI compliance, it's up to you to do so.
Staff and Project Managers are automatically locked out of any record that is out for ballot until the ballot has been closed.