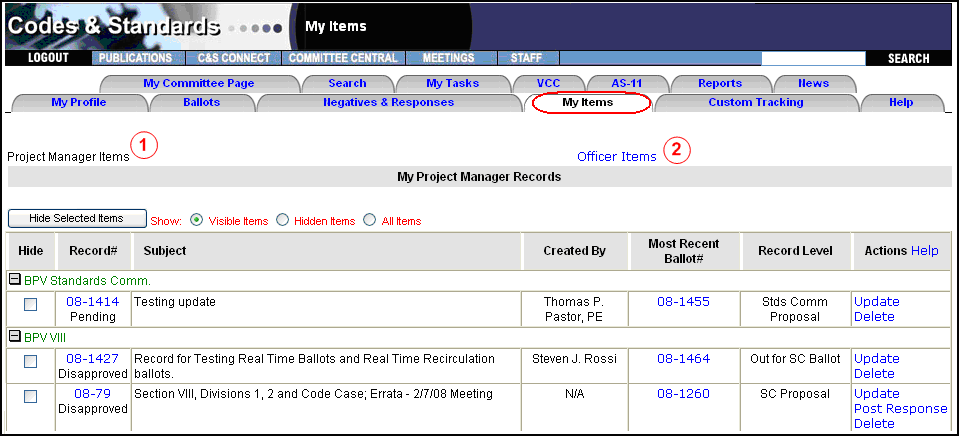
The Project Manager Records tab has been renamed the My Items tab. On the My Items tab you are able to see all committee records for which you were designated as the project manager. The functionality of this tab has been expanded and parts of the tab have been renamed for increased accuracy and ease of use.

This tab contains two major groups of information, Project Manager Items and Officer Items. Upon opening the tab defaults to viewing Project Manager Items.
Project Manager Items (1)
This displays a list of all records that you are assigned to as the Project Manager.
Officer Items (2)
This displays a list of all records and ballots that you created as an Officer. Note that Staff Secretaries will see a list of all items created by officers whose committees they are assigned to.
Both Project Manager Items and Officer Items links will be available even if you are not currently listed as a Project Manager or an Officer. If this is the case that tab will say “No Items Listed”.
In all screens of the My Items tab (Project Manager Items, Officer Items > Officer Records, and Officer Items > Officer Ballots) you have the option to hide a record in order to keep the tab uncluttered. Hiding a record is not a permanent change and hidden records are still easy to access.
Once a record reaches Board Approved, and higher, it usually means that the change is going to be published. Thus, the project manager will no longer need to edit the proposal file or post responses. However the record would still show on the My Items tab. At that point, the project manager may want to hide the record so that their tab doesn't get cluttered and only shows the records they are currently working on. This is not a permanent change: Records can be hidden and un-hidden very easily, and hiding a record in no way means you are deleting it.
Under the Hide column (1), click on the checkbox next to the appropriate Record #
When you are done selecting records you want to hide, click the Hide Selected Records button (2). The records will be taken off of your view
To see a list of your hidden records, check Hidden Records (3):

To move a record from a hidden view back to the visible view, select it (them) from the list (1-below), and then click on the Show Selected Records (2- below) button
To See Hidden and Visible records on the same view, check All Records (3):

Overview:
The Project Manager Items section of the My Items tab will show all records to which you have been assigned as Project Manager. In addition to allowing you to view the record information it will allow you to Update the record, Post a Response, or send a request to the Staff Secretary to Delete the record.
Label Changes:
Due to the changes in the My Items tab some of the information available here was re-labeled for increased accuracy and ease of use.
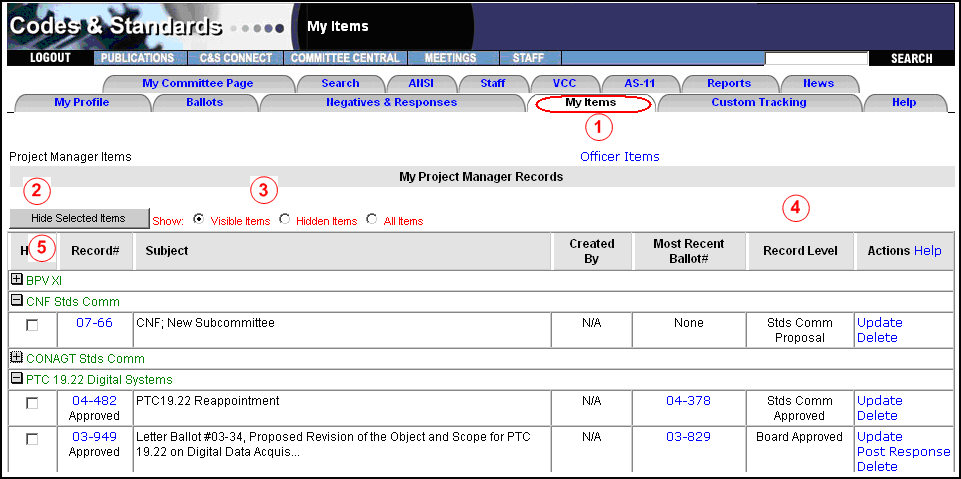
Project Mgr Records Tab has been renamed My Items (1)
Hide Selected Records has been rename Hide Selected Items (2)
For Hidden Items, Show Selected Records has been rename Show Selected Items
Visible Records, Hidden Records, All Records has been renamed Visible Items, Hidden Items, All Items (3)
Item Level has been renamed Record Level (4)
Tracking # is also known as Record # (5)

Column Overview:
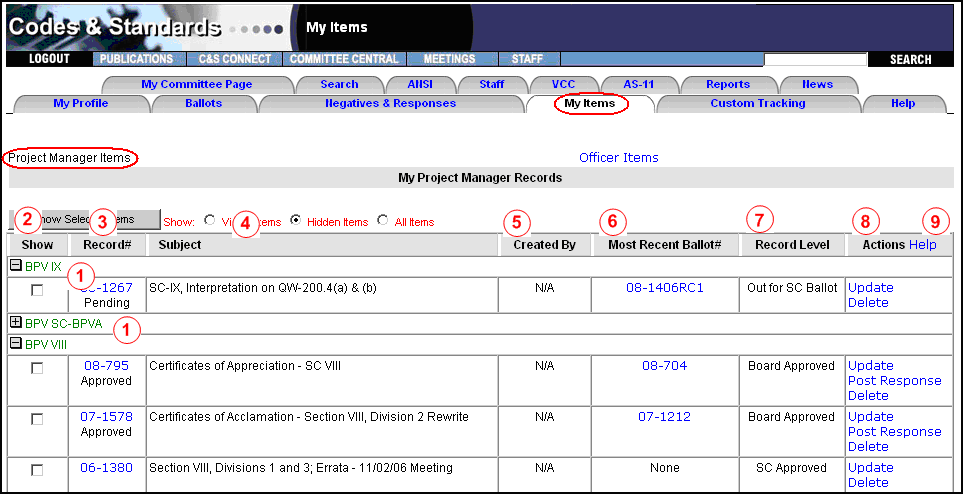
Primary Committees: This is the primary committee responsible for the record. The committee is displayed in a separate row instead of a column. It includes an expand/collapse button that when clicked will allow you to view all records that are listed for a particular committee. Displays the abbreviated name of the primary committee of this record. (1)
Show / Hide: Allows you to Show or Hide the records depending on whether you are viewing visible or hidden records at the time (see My Items Overview for details). (2)
Record#: Number assigned to the record in C&S Connect. (3)
Subject: Truncated preview of the record’s subject field for ease of reference. (4)
Created By: Name of the User who created the record. The user’s name is displayed in First Last, Accreditation format. (5)
Most Recent Ballot#: Most recent ballot number on which the record was included. The ballot number is displayed as a blue hyperlink. When selected the Ballot Form is opened in view mode. (6)
Record Level: Where the record is in its life cycle. (7)
Actions: Actions you can take on this record. Options are Update, Post Response, and Delete, but some may not be available based on the Record Level. Actions are displayed as blue hyperlinks and clicking the hyperlink will open the relevant action window (details below). (8)
Help: Displays a window that describes the available actions. (9)
Record actions available on the Project Manager Items tab are Update, Delete and Post Response:
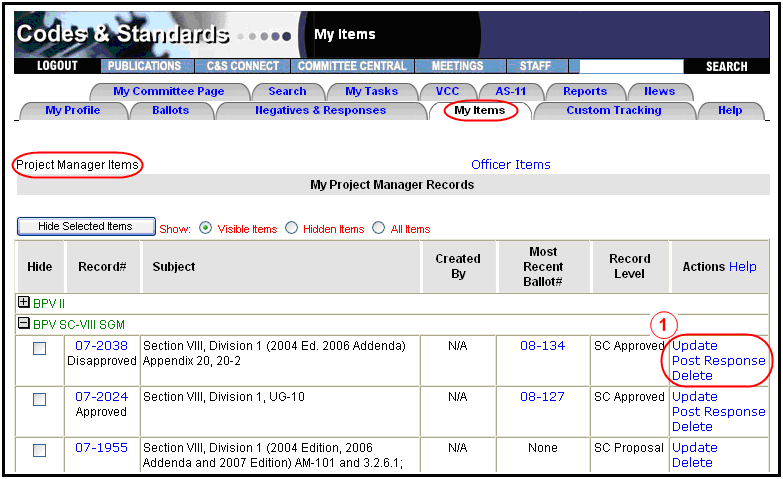
Allows you to update the editable fields on the record. Which fields are editable depend on the record level and ballot status. Depending on the Record Type one of the following update forms will be displayed:
Update Component Record Form
Update Code Case Record Form
Update Interpretations Record Form
To Update the Record Form:
Locate the record you would like to update and click the Update link.
The update record form will open in a new window.
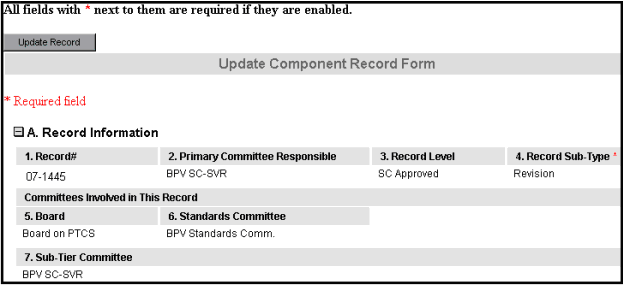
You can enter information into the text fields located in section, "B. Record Description": Subject (required field), Proposal, Explanation (required field) and Summary of Changes.
Note: Please refer to the Project Manger Access Table for various access levels
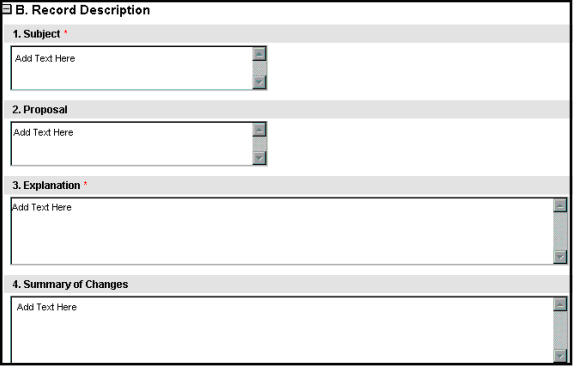
You can upload section, "C. File Attachments": Proposal File, Background Material File, and Committee Correspondence File
Note: Please refer to the Project Manger Access Table for various access levels
To upload a file, click on the View/Manage Attachment History button
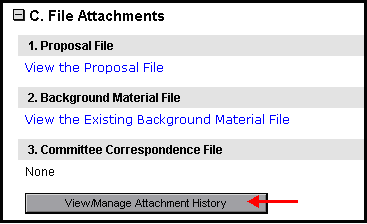
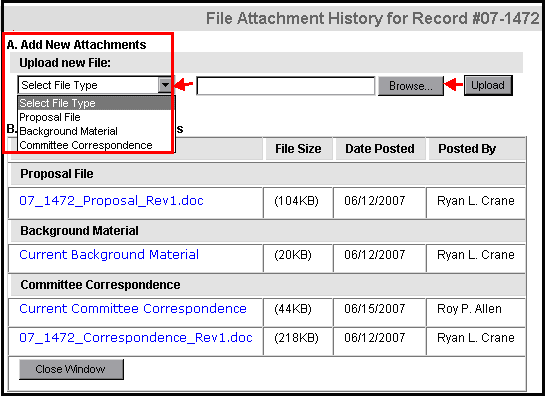
You will be redirected to the File Attachment History for Record ##-####.
To upload a new file go to:
Add New Attachments> Upload new File> Select File Type> and click on the down arrow for a drop down menu and choose one file type: Proposal File, Background Material or Committee Correspondence
Click on the Browse button and the system will search your hard drive to find the file
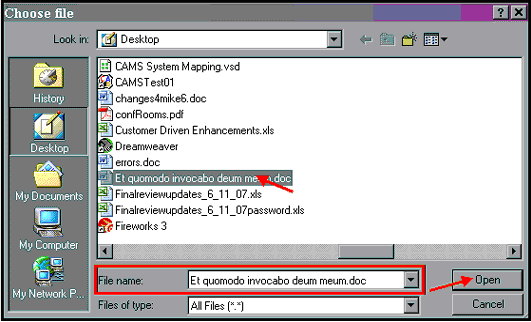
A dialogue box, Choose file will prompt you to locate the file. Click on the file to upload and make sure it shows under File name: click on Open. (Recommend commonly used files, e.g. PDF, MSWord, or MSExcel)
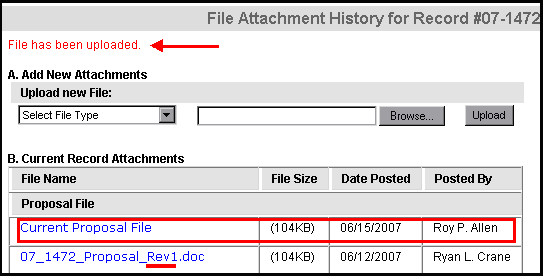
You will be redirected to the File Attachment History for Record ##-#### again and the final step is to click on the Upload button:

To ensure that the file is uploaded, it will state so on the upper left hand corner, in red text: File has been uploaded
The new file will be automatically be renamed as Current Proposal File, and the File Size, Date Posted and Posted By will now state your name
The previous proposal file will be automatically renamed with the file type and extension Rev#. To continue, close the window to return to the record form
If you need to upload additional files for other file types, repeat steps A6 - A14 and choose the appropriate File Types:
This action is only available if there is a Ballot # listed and if that ballot has comments or negatives posted for that Record. If available and clicked, the Post Response Form is displayed.
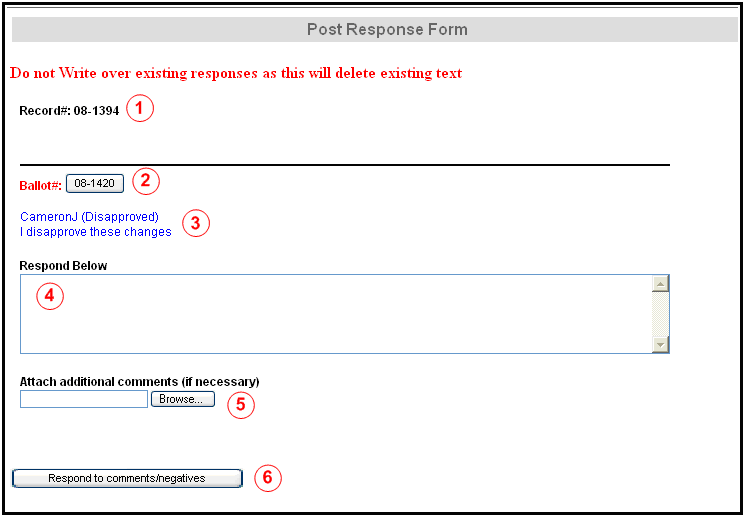
Record#: Displays the Record Number that you are posting responses on (1)
Ballot Link: Shows the Ballot Number that the comments were recorded on. Clicking on this button will bring up the View Ballot Form. (2)
Vote / Comment: Displays the vote that the voter chose for that Record (Approved, Disapproved, Abstain, Not Voting, etc.) as well as the comment accompanying the vote. (3)
Response Box: Enter your response here. (4)
Attach Additional Comments: If a lengthier response is needed you may attach a file. (5)
Respond to Comments/Negatives: When follow up response is complete click this button to submit to C&S Connect. (6)
Note: If the record has more than one comment/negative posted for that ballot, Items 2 – 5 will repeat for each comment/negative. The comments will display in alphabetical order base on the last name, first initial of the voter.
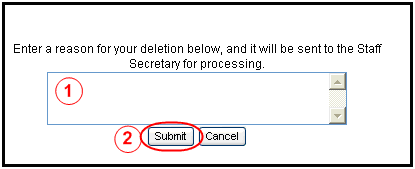
Clicking the Delete link allows you to nominate the ballot for deletion by sending a reason for deletion to the staff secretary. Only the staff secretary can approve and perform the deletion, as it may require a ballot is closed or deleted first.
To nominate a Ballot for deletion:
Click on the Delete link
Enter a reason why you’d like the ballot deleted (1)
Click Submit (2)
An email will be sent to the Staff Secretary alerting him/her of your request
To see the Officer Items View on the My Items tab, click on the link for Officer Items:

The Officer Items Tab allows officers to see all records and ballots that they have created. The Officer Items Tab defaults to showing Records. If you would like to view Ballots you must click the “Show Ballots” button.
Note: For Staff Secretaries, this tab shows all items created by the officers of committees to which the secretary is assigned. If you are not an officer or have not created any items then this tab will say “No Items Listed."
The Officer Ballots sub tab will show you all ballots that you created as an officer. In addition to allowing you to view the ballot information it will allow you to Update the ballot, Close the ballot, Send a Reminder Email to everyone who has not voted on the Ballot, or send a request to the Staff Secretary to Delete the Ballot.
Label Changes:
Due to the changes in the My Items tab some of the information available here was re-labeled for increased accuracy and ease of use.

Project Mgr Records Tab has been renamed My Items (1)
Hide Selected Records has been rename Hide Selected Items (2)
For Hidden Items, Show Selected Records has been rename Show Selected Items
Visible Records, Hidden Records, All Records has been renamed Visible Items, Hidden Items, All Items (3)
Item Level has been renamed Ballot Level (4)
Tracking # is also known as Ballot # (5)

Primary Committee: This is the primary committee responsible for the record/ballot. The committee is displayed in a separate row instead of a column. It includes an expand/collapse button that when clicked will allow you to view all records that are listed for a particular committee. Displays the abbreviated name of the primary committee of this ballot. (1)
Show / Hide: Allows you to Show or Hide the ballots depending on whether you are viewing visible or hidden ballots at the time (see My Items Overview for details). (2)
Ballot#: Tracking number assigned to the ballot in C&S Connect. (3)
Description: Truncated preview of the ballot’s description field for ease of reference. (4)
Created By: Name of the User who created the ballot. The name is displayed as First Last, Accreditation format. (5)
Created Date: Date the ballot was created. (6)
Ballot Level: Where the ballot is in its lifecycle. (7)
Actions: Actions you can take on this ballot. Options are Update, Close, Send Reminder, and Delete, but some may not be available based on the Ballot Level. Actions are displayed as blue hyperlinks and clicking the hyperlink will open the relevant action window (details below). (8)
Help: Displays a window that describes the available actions. (9)

The Actions column lists all actions available to the user for each ballot in the Officer Items > Officer Ballots tab. Actions were changed from buttons to hyperlinks. (1) Ballot actions are: Update/Close, Send Reminder,and Delete
Allows you to update and/or close the ballot.
To Update the Ballot:
Simply edit the Description, Explanation or Opening/Closing Staff Remarks, and click Update Ballot. Changes made will be reflected on the system immediately.
To Close the Ballot:
Click on the Ballots tab, and click Update for the desired ballot.

Clear the checkbox for Status (Check box if open).
Enter or attach any comments, if desired, in the Opening/Closing Staff Remarks, Voting Results, or Closure Letter File fields.
Click Update Ballot. This closes the ballot, removes it from the voter’s Ballots tab, and sends an auto email notification to members. The page then refreshes.
Note: When the automatic email notifies committee members and the staff secretary of the closure, print, save, or attach this email to the ballot to be compliant with ANSI procedures.
The refreshed page displays the Status of Records section.

Note: It is crucial that you update the Status of Records after closing the ballot. To do so, please use your committee’s consensus rules to determine whether a record is Approved or Disapproved. Failure to update the Status of Records could compromise the records for use on later ballots. Records with a final status of “Pending” cannot be included on a new ballot. Furthermore, only records with a final status of “Approved” appear on a BSR-8 or -9; all others are excluded.
To Update the Status of Records:
Locate the Item# (Record Number) for the Record you would like to update (1)
Select the radio button for the status of that Record in the Record Status column (2)
Once you click update, the system will automatically date the status you chose, and it will show in the Record Status Date column (3)
Once you have selected a status for all the records you would like to update, click the Update Ballot button (4).
Clicking the Send Reminder link opens a form that allows you to send a reminder email to all committee members who have not yet voted on this ballot.

Committees Balloted: This table shows the tallies for each Record on the Ballot and each Committee Balloted. It shows you the total number of people who voted Approved, Disapproved, Disapproved w/out Comment (staff function only), Abstain, Not Voting, and Not Returned. (1)
Votes Posted by Staff: This button opens up a pop up window listing the votes that were manually submitted by staff members. (2)
View Members w/out E-Mail Addresses: This button opens up a pop up window that shows any committee members who do not have e-mail addresses. (3)
E-mail Reminder: This button will send an E-Mail Reminder to everyone whose vote is listed as “Not Returned” in the Committees Balloted box. (4)
Clicking the Delete link allows you to nominate the ballot for deletion by sending a reason for deletion to the staff secretary. Only the staff secretary can approve and perform the deletion, as it may require a ballot is closed or deleted first.
To nominate a Ballot for deletion:
Click on the Delete link
Enter a reason why you’d like the ballot deleted (1)
Click Submit (2)
An email will be sent to the Staff Secretary alerting him/her of your request
The Officer Records sub tab will show you all records that you created as an officer. In addition to allowing you to view the record information it will allow you to Update the record, Post a Response, or send a request to the Staff Secretary to Delete the record.
Label Changes
Due to the changes in the My Items tab some of the information available here was relabeled for increased accuracy and ease of use:
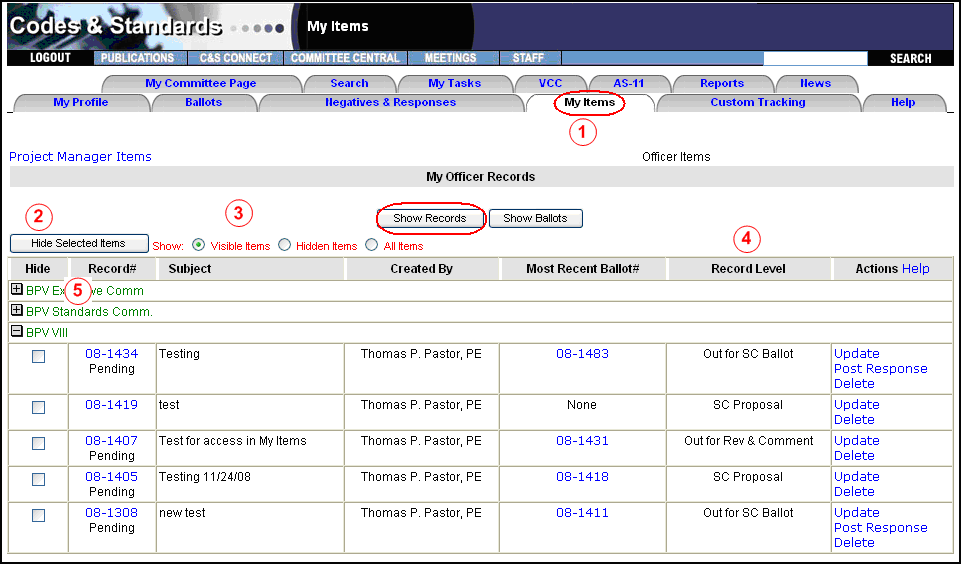
Project Mgr Records Tab has been renamed My Items (1)
Hide Selected Records has been rename Hide Selected Items (2)
For Hidden Items, Show Selected Records has been rename Show Selected Items
Visible Records, Hidden Records, All Records has been renamed Visible Items, Hidden Items, All Items (3)
Item Level has been renamed Record Level (4)
Tracking # is also known as Record # (5)
Click here for a column overview.
Record actions available on the My Officer Records tab are Update, Delete, and Post Response.
Clicking Update allows you to update the editable fields on the record form. Which fields are editable depend on the record level and ballot status. Upon click, the Component Record form will open in Update mode.
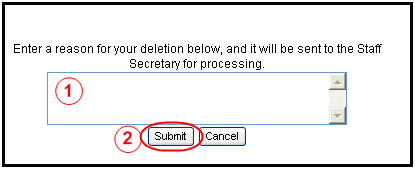
Clicking the Delete link allows you to nominate the ballot for deletion by sending a reason for deletion to the staff secretary. Only the staff secretary can approve and perform the deletion, as it may require a ballot is closed or deleted first.
To nominate a Ballot for deletion:
Click on the Delete link
Enter a reason why you’d like the ballot deleted (1)
Click Submit (2)
An email will be sent to the Staff Secretary alerting him/her of your request
This action is only available if there is a Ballot # listed and if that ballot has comments or negatives posted for that Record. If available and clicked, the Post Response Form is displayed.
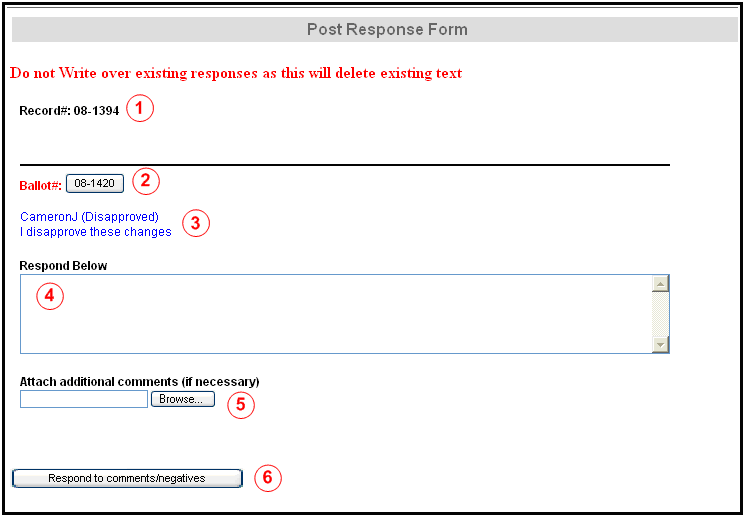
Record#: Displays the Record Number that you are posting responses on (1)
Ballot Link: Shows the Ballot Number that the comments were recorded on. Clicking on this button will bring up the View Ballot Form. (2)
Vote / Comment: Displays the vote that the voter chose for that Record (Approved, Disapproved, Abstain, Not Voting, etc.) as well as the comment accompanying the vote. (3)
Response Box: Enter your response here. (4)
Attach Additional Comments: If a lengthier response is needed you may attach a file. (5)
Respond to Comments/Negatives: When follow up response is complete click this button to submit to C&S Connect. (6)
Note: If the record has more than one comment/negative posted for that ballot, Items 2 – 5 will repeat for each comment/negative. The comments will display in alphabetical order base on the last name, first initial of the voter.